 |
| OpenCPN with GPS and AIS input Overlay |
OpenCPN
Installing opencpn is a breeze. Simply download the file from the OpenCpn site [here]and follow the on screen steps taking note to specify he charts directory containing your CM93 maps. It has been recommended that the CM93 charts be copied to the root of your C:/ drive.
BU353
configuring the BU353 can be a bit tricky particularly if you are using windows 7.
configuring the BU353 can be a bit tricky particularly if you are using windows 7.
The drivers for the BU353 can be downloaded [here].
- Install these drivers prior to plugging the gps unit in.
- Open the "Devices and Printers" page under control panel and then right click on your "Prolific serial-usb com port">Properties (take note of the comm port number as this information will be used later when setting up xport)
- Ensure that the settings under the advanced tab are the same as those below: Baud Rate: 4800
Data bit: 8
Parity: None
Stop Bit: 1
Flow Control: None
XPort
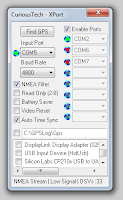
 Xport is necessary in order to prevent Opencpn from communicating with the gps unit and the resulting blue screen of death. This doesn't seem to happen on every machine however as a preventative measure I would recommend installing the program.
The program itself can be downloaded from Curious Technologies site [here]
Once downloaded you will need to copy the program to a location on your harddrive and then it. This will add a entry to your startup programs file(note that you may need to configure certain security programs to allow such a action)
- Select the input port as determined under setting up the Prolific serial-usb com port
- Next you will need to assign a fictitious port o be created on the right hand side taking note of the port number once again (this will be used later when setting up xport)
- Check the enable port tickbox and then close xport(this will simply minimize the program to your quicklaunch area.
AIS Marine Radar
The usb AIS marine radar is the easiest component to setup in my experience. Simply download the neccesary drivers from thier site [Here] . Install taking note to allow the unsigned drivers to be trusted. Once installed insert the usb dongle(ensure that a antenna is connected as using the device without one can damage it) goto control panel and look for your Marine Radar device. A com port number should be displayed next to it. Take note of this!
Putting it all together
The last step is simple. Open the OpenCPN program installed in the earlier steps and then click the wrench icon in the top tool palette. A settings screen should appear.
- From here click the GPS tab and then select the com port that we enabled when setting up xport(this is the virtual com port and not the actual gps com port)
- Click the AIS tab at the top of the screen and once again select the AIS com port from the dropdown box
- Save your changes
No comments:
Post a Comment